Lab 1:
Angles and Scales |
Additional information may be found in the textbook in
chapter 1, section 1.1 on page 4, and chapter 2. See also Table 2.1 on
page 39.
Welcome to the wonderful world of astronomy here at Georgia State
University! Hopefully you are taking this class because you have some
interest in the subject (and because it fills your science lab
requirement) and not just because it fills out your schedule this
semester...
Throughout this course you will be introduced to a variety of topics in
the broad scheme of astronomy. What you learn in the laboratory exercises
is meant to supplement and clarify what is discussed in the lectures.
You will be tested on the lab material, though, as well as the lecture
material, so make sure that you understand what is being asked of you in
each case. If for any reason you do not understand the objectives, ASK
SOMEONE!! Your lab instructor is a great place to start. Since the
labs are made up of 25 students or less, it is a lot easier for the
instructor to get to know you and give more individualized attention.
But it is still good to know your professor. The way the lab side of the
course is taught, there are a lot of basic skills that you will need to
master and as the course progresses, these skills will build on each other
more and more. That is why you really need to make sure you understand
what each lab is about.
This first lab that you will be doing has a lot of the basics that are
needed throughout the course. Part of the first lab meeting is spent
going over all the introductions and general housekeeping things that need
to be done at the beginning of each new semester. This does not mean that
you should skip the class on the assumption that nothing is really covered
on the first week. You will be doing a lab at the first lab
meeting and it will be for a grade.
Here are some of the general things that are covered
on the first week of lab:
Your lab instructor will introduce himself or herself and tell you how you
can get in contact with them if you need to see them outside of class
time. We are usually easy to find, especially with access to the
internet. At Georgia State University,
the Physics and Astronomy department is one department with one chairman,
even though Physics and Astronomy are in separate buildings.
There is a general web page for the entire department at www.phy-astr.gsu.edu. From there
you can get to the Astronomy page at www.chara.gsu.edu.
From the astronomy web page you can find listings for all of the
professors and lab instructors including office numbers and e-mail
addresses.
Your lab instructor will also go over the lab syllabus and the general rules of the
classroom. One of the major rules is show up for the lab time to which
you are assigned. Most of the classes are full and there are many
labs where there is not enough equipment to go around if a few more
students decide to randomly show up for a different class time. If for
some reason you feel you need to change lab times, either permanently or
for one week, you must clear it with the lab coordinator, John Wilson. You are responsible
for all of the information on the lab syllabus whether or not the
instructor reads it out to you, so keep it handy. Among other
things that you will find on it is a schedule of which lab you will do
each week since not all of the labs are in the book and they are not
always done in numerical order.
Another thing that your lab instructor will go over is the observing
session requirement. Every student in ASTR 1010 and 1020 is expected to
go to one (1) observing session per class term. (This means that you are
expected to go once when taking 1010 and once when taking 1020.) The
sessions are held in the evening at Georgia State on the roof of the Urban
Life building, at Agnes Scott
College's Bradley Observatory in Decatur, or at GSU's Hard Labor Creek Observatory in Rutledge.
Students may also attend public sessions at the Fernbank Science Center (the old
building, not the new museum). The sessions are short and informal,
though total time depends on how clear the sky is that night and how many
students show up. The purpose of these sessions is to allow the students
to actually see how the telescopes and observatories work. There is a schedule put out every semester
listing about 15 to 20 sessions to choose from, but please note that they
can be cancelled due to weather, so call the information number that is
listed to make sure the session is still planned for that evening. Also
note that the open house sessions at HLCO and ASC each month are
held rain or shine. Note: there is a separate
observing schedule for 1010 and 1020 students.
The purpose of this lab is to refresh your memory, or perhaps to teach
you, about how to properly use a compass and protractor. There are two
main sections of this lab. The first section focuses on angular
measurements and using a protractor, while the second section focuses on
drawing with a compass and following directions.
Measuring Angles Before you can measure or
draw an angle, you must first understand how to use a protractor. There
are many styles of protractors, but they all have certain things in
common. There are 360o (360 degrees) in a full circle. Most
protractors that you see are half-circles and therefore can measure angles
between 0o and 180o (half of 360o).
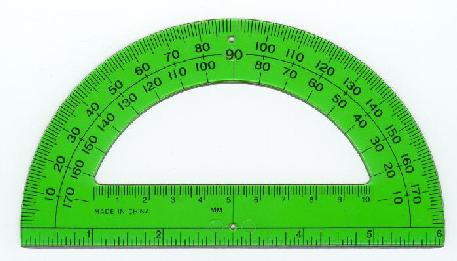
Protractor
On the flat side of the protractor in the middle there will be either a
hole or cross hairs. This is where the point of the angle must go when
measuring. There is also usually a line that goes through this point and
from one side of the protractor to the other. Sometimes, as shown above,
there are no numbers on this line, but 0 or 180 are measured from here.
This is also an important part of the tool when measuring. Along the
curved part of the protractor there are several number markings with 90 in
the middle. Most protractors have two sets of numbers for each marking.
One set goes from 0 to 180 and the other set goes from 180 to 0. This is
so you can measure an angle from either side. Make sure you know which
row of numbers to read when you measure! When you line up the protractor
along the angle, one side will be lined up at 0 (either the inner or outer
set of numbers). This will tell you which number to read.
To line up a protractor with an angle, you must put the point of the angle
at the hole or cross hairs as stated above. Then you have to place the
long straight line on the straight side of the protractor along one of the
lines of the angle. After noting where the 0 is, look at the other line
of the angle. Where it crosses the curve of the protractor is where you
need to read the angular measurement.
There are certain things that you can do to make sure that your
measurement makes sense. A 90o angle is a right angle, like an
L. If the angle that you are measuring is
wider than an "L", then it has more than
90o. If it is narrower than an "L", then it has less than 90o.
Some of the angles that you are asked to measure are greater than
180o, though, and your protractor only goes up to
180o. There are two ways of measuring these angles. This is
the simpler of the two methods. Keep in mind that there are
360o in a full circle. If you want to measure a large angle,
you can instead measure the interior angle and subtract this from the full
circle, which will leave you with the large angle. Think about a pie with
a slice missing. You can measure the remaining pie to get the large
angle, or you can measure the piece that is missing and subtract that from
the whole thing.
Drawing Angles
To draw a particular angle, you basically work backwards from what you did
to measure it. First you must draw a guide line. This line will become
one side of your angle. Either mark a spot on the line or use one of the
ends as the point of the angle. Line up the protractor along this line
with the hole/cross hair on the end or marked point. After noting where 0
is, find the measure you want along the curve and put a dot there.
Remove the protractor and draw a line from this point to the marked spot
on the line.
For drawing large angles, it is usually easiest to draw the smaller
interior angle, just like in the measurement section above, and then
denote the larger outer angle with an arrow as the angles are shown in the
book.
Scale Drawings of the Solar System
 The second part of the lab is a scale drawing of the solar system. For
this part, you must first fill out Tables II and III. Tables I and IV
will not be done this week. The planets' orbits are not truly
circles, as you will draw them here today, but a circle is a good
approximation. You will learn how to create more accurate orbits in lab 4.
The second part of the lab is a scale drawing of the solar system. For
this part, you must first fill out Tables II and III. Tables I and IV
will not be done this week. The planets' orbits are not truly
circles, as you will draw them here today, but a circle is a good
approximation. You will learn how to create more accurate orbits in lab 4.
The tables that you are filling out determine a scale for the drawing.
The solar system is very large and we must determine a smaller scale in
order for the orbits to fit on the page. Even with a scale as small as we
are using, you cannot put all of the planetary orbits on one page where
you can still read them. Therefore, you will do two drawings: one of the
inner planets and one of the outer planets. Jupiter will be in both
drawings so you can get an idea of just how large the outer orbits
are.
For the inner planets you are given a scale factor of 1 AU = 2 cm. This
means that every 2 cm on your drawing represents 1 AU in real space. The
orbit radii are given to you in AU, so you must convert them to cm. You
do this by multiplying by the scale factor: 2 cm / 1 AU. You can do this
because 2 cm is equal to 1 AU and therefore you are multipying by 1 and
anything multiplied by 1 is itself. When you multiply by this factor, the
units of AU cancel each other out and what you are left with are distances
in cm. The same thing is true for the outer planets listed in Table III,
except that the scale factor is now 1 AU = 0.25 cm.
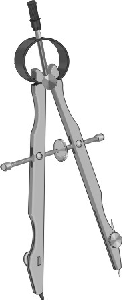
Once you calculate the scales of the orbits, you have to know how to set
the compass to draw the orbits. There is a small scale etched into the
band on some compasses. NEVER USE THIS SCALE!! You are asked
to draw circles to a greater degree of accuracy than you can measure with
these tiny scales. Instead you will use a ruler to set the compass. Put
one point of the compass at 0 cm on the ruler. Extend the other point of
the compas to the distance marking that you want. Now put the sharp point
of the compass on the dot marked "Sun". Move the compass in a circle
around this point (or turn the paper underneath it) to draw the orbit.
Label everything that the book asks you to label. Note: there is
something extra that you have to either label or draw differently
in both the inner and outer planet drawings, so read the directions
carefully.
Remember: Everything that is
covered in this lab you are expected to be able to repeat later. If you
have trouble using a protractor or compass, please get help from either
your lab instructor or someone else because you will be using them a lot
in future labs.